Wednesday, April 4, 2012

Grilled Steak & Spring Vegetable Salad


Recently my two year old has decided that grilling is her favorite way to cook. She thinks of it as a free pass to play outside. Since we all need a little vitamin D, I clipped this recipe to try over the weekend. We stopped during the week and purchased all of the ingredients, except the asparagus. The grocery store we were in did not have any. Isn't that kind of strange?

I started with the dressing. I thought fresh lemon juice would be better than from a bottle. I used three half lemons and think it was close to five tablespoons. I used just under a ¼ cup of olive oil to try to keep things light. I used grated parmesan cheese from the fridge because it was available, and because I figured I could skip the blender and just mix it in a bowl, saving some cleaning. Real chefs would probably frown upon this, but sometimes you have to make your life manageable for yourself. I mixed up the dressing and set it aside. I added a little extra salt and a bunch of pepper and performed a taste test. So far so good! I began gathering the grilling items and then remembered we didn’t have any asparagus. To the grocery store we went!

As a side note, I am just like the majority of the population in that I enter the grocery store and exit with 15 items, sometimes without the item I need. To avoid this issue, we went into the grocery store and found the asparagus first, then got a basket for other items. Why I decided a fresh papaya, avocados and gummy bears were essential I cannot say but once we found the milk and the basket got heavy, we were ready to go. Not before I let my two year old hold the can of orange soda I was drinking while I carried the basket. She finished the soda by drinking/spilling it down her shirt. Fortunately, she was wearing her Halloween pumpkin shirt so you could barely see it. Yes, I am aware that it is April, but she loves that outfit and it still fits! Incidentally, orange soda mustache is hard to get off of a two year old’s face.

We returned home, put the excess groceries away and then got back down to business. We gathered all of our grilling supplies and headed outside. Two minutes later we returned to get sunglasses, tinfoil, paper towels, and cups of water. J Once I go the grill started, I put on the steak. Yes, I made the rather obvious mistake of putting the meat on before the grill was really hot. So the meat did not have the charred look of the grill, but cooked up okay. I cooked the asparagus and the artichoke hearts until the asparagus was done. I think the artichoke hearts could’ve used more charring, but it was getting late and we were hungry!

Back inside, I cut up the steak, asparagus and artichoke hearts and put them in the bowl with the cherry tomatoes. Then I removed them from the bowl, halved the tomatoes and again added the grilled items. I poured approximately half of the dressing over them and tossed with spoons. I rinsed off the arugula. I used baby arugula because that’s all that was available and really, who doesn’t love miniature everything? I will comment that four cups of arugula is a gargantuan portion. I think we’d have been fine with two cups and the same dressing.  I tossed the rest of the dressing with the arugula and got out some plates, as the photo shows above. I put the grated store bought parmesan cheese on the table and we sat down to eat. As it turns out, my two year old loves arugula, as long as you coat each piece with parmesan cheese! She asked for more cheese about a dozen times and ate most of the plate. I may have had seconds! The most important lesson from this recipe though is that it is fun to watch a two year old say arugula with an orange mustache.

Tuesday, April 3, 2012

Mjeddrah (Middle Eastern Lentil Pilaf)


I am just going to come out and say it, this dish the way I made it looks a little like a bowl of gray goop. Shockingly, I may have made a couple of errors making it! However, it tastes pretty good. Try to keep an open mind…….

I started screwing up this recipe in the grocery store. The recipe calls for brown or red lentils. I looked all over and all I could find were lentils with a garlic and herb packet. The bag just says lentils and to me they look green rather than brown or red. Since that was the only option, I decided that maybe the greenish lentils were similar to brown. I am not sure what kind of alien logic determined this for me, but there it is. In the same aisle (I swear I was dead sober throughout this entire exercise) I looked for long grain wild rice. Since wild rice seemed to be the wrong choice (in retrospect, a far better one than I selected) I bought the only brown rice in the aisle. Unfortunately, it was boil-in-a-bag rice and that might not be what they traditionally use in Middle Eastern cooking. Finally, I wandered around the spice aisle looking for cardamom pods. No dice. So I bought a jar of ground cardamom and called it a day.

When I decided to tackle the recipe, I again proved that following directions is only of marginal importance in my world. I rinsed off the lentils (I wasn’t sure what they meant by picked over, they looked alright to me) and put them in the boiling water. They sat for about three hours before it was time to make dinner according to my two year old’s clock. I laid out all of the ingredients and started to look for the carrot peeler. Then I remember I lost it in dish washer accident (it slipped down into the bottom and the handle broke off, no damage to the dish washer) a year ago which drives home how dependent I am on bags of baby carrots and frozen vegetables. Fortunately, I remembered I have a knife that I have neglected to sharpen, ever, so it seemed dull enough to use as a peeler without losing a digit. This worked out much better than my plans typically do.

I sautéed the onions, celery and carrots and all seemed well. I added them into the pot of lentils. Then I transferred the whole mixture into a larger pot since there was no way everything was going to fit. At least none of the pots in my house get lonely when I cook. I added three cups of water under the same delusion that green lentils and brown lentils are the same and then removed the rice from the boil in the bag home it knew and threw it into the pot. I added the garlic (finely chopped in my world but kind of chunky for the general population), Chile pepper and cinnamon stick. The cumin was no problem but when I got to the cardamom, I remembered I needed a whole pod equivalent. Google indicated that two pods is approximately 1/3 of a teaspoon. This isn’t terribly convenient information since I don’t have a 1/3 teaspoon in my measuring spoons set; however, the recipe called for 2-4 pods so between 1/3 and 2/3 of a teaspoon, or a heaping ½ teaspoon it is! I brought it to a boil as instructed. The final error comes with the additional water. I added a cup about halfway through and then poured it off towards the end. I also ended up turning up the heat at the end in the attempt to de-humidify the mix. As you can see from the photo, maybe not as successfully as I hoped!

At this point, my two year old is hugging my leg saying “Mom, I am SO hungry” so I added a bunch of salt and pepper, maybe 20 twists a piece from the grinder. This seems like a lot, but I had a veritable vat of Mjeddrah at this point. Then it was time to eat. Amazingly, even though it looked like a pile of goop, it tasted pretty good. My two year old liked it and ate two helpings. We had it the next day. And the next. The recipe says six servings but this is true only if you are feeding calorie loading super distance runners at your house. Next time, I might try to find the correct lentils and rice. Or I might just cook the vegetables and add the spices. It might be just as delicious, better for me and look more appetizing! Ah well, you can’t win them all!

Wednesday, March 28, 2012

Tzatziki


I got this recipe from my sister. She said the recipe was hand written, so this recipe could be from anywhere. Thanks to the nameless person who gave it to her!

Ingredients
2 cups of Greek yogurt
3 cloves of garlic
One cucumber
Salt
Pepper

First, I peeled the cucumber and started to slice it into rounds. Then I remembered to look at the instructions from my test message and sliced the cucumber lengthwise so I could scoop out the seeds. This was pretty easy, as running the bowl end of the spoon down the center of each side of the cucumber got them all out! I chopped up the cucumber into small pieces and added them to the yogurt in the bowl. My sister mentioned that some people put the cucumber into a food processor to get the cucumber bits finely chopped, but she doesn’t mind bigger chunks of cucumber. Since I don’t own a food processor and wanted to eat dinner as soon as possible, I opted for the bigger chunks as well. She also mentioned preferring whole fat or 2% yogurt over the nonfat kind. Since they only had plain nonfat Greek yogurt at the grocery store I visited and fruit flavored Greek yogurt sounded pretty awful in this recipe, I went the nonfat route.

After peeling the garlic cloves I minced the garlic as small as I could with a knife. I really need to practice this skill so I had some larger bits of raw garlic than most people would prefer. I mixed it into the yogurt and cucumber and then used the salt and pepper grinders, about ten twists for the salt and five for the pepper. I served it with slices of orange bell pepper and celery. My two year old went to town with it. She dipped her steak into it as well as the vegetables, which was a genius move and tasted quite good! She even told her Grandparents she liked the white sauce, so we have a winner. **Warning, if you are serving this to a two year old and lack garlic mincing skills, have some milk handy for when they strike a garlic nugget!

The Tzatziki travelled to work for lunch well so the leftover is being used. I think the next time I make this I might add some dill to see how it tastes. Anything that encourages vegetable consumption in the toddler set has my vote!

Tuesday, March 27, 2012


I cut this recipe out of the Virginian Pilot which is, as one would imagine by now, the only physical newspaper I receive! It sounded good as written, but I made a few modifications. I am capable of following directions, just unwilling to do so!
First, I reduced the oil to approximately ½ a teaspoon. The article that accompanied this may have indicated you can just use zero calorie cooking spray as well. Next time I might do that to limit the fat and calories. It would be important to heat the pan first. I have burned plenty of garlic in my life trying to get the pan hot after putting the garlic in!
I used a cherry red pepper that was diced more than thinly sliced. I did remove all of the seeds of the pepper. I also used a tablespoon of pre-chopped garlic. Hungry two year olds do not wait for fresh chopped garlic! I added both to the hot pan. Once I could smell them cooking I added a bag of spinach, after rinsing it off. It cooked up in a couple of minutes like the recipe said, stirring continuously. If you don’t some will wilt and some will not, so the dish will look funny. It should also be noted that a bag of spinach wilts into two adult servings so if you are cooking for a crew, you need to make more!
Once I took it off the stove, I added some salt and garnished with a lemon (see photo). Once we sat down to dinner, I discovered two things:

1.      Dicing the pepper instead of thinly slicing keeps the spice form permeating the spinach. In my case, this was ideal since my two year old doesn’t care for spicy things yet.

2.      The lemon makes the dish. Adding it offsets the spice a bit and goes great with the spinach. This should be the first ingredient in the recipe!

My two year old ate the spinach without the pepper (and most of a lemon wedge, kids are funny). I squeezed the lemon over the leftovers and ate them the next day and the flavor was intact. Another one for the keeper file!

Monday, March 26, 2012

Pear Tart (with Strawberries)


Hello everyone (everyonebeing my sister!)

I clipped the pear tart recipe out of Parade Magazine. The author is Gail Simmons, who was on Top Chef Just Desserts. I haven’t seen the show or heard anything about her, but the recipe looked delicious and I have a tendency to make dry, bland, marginally okay tasting pastries at best, so I need something in my arsenal to feed my parents when they come to visit their grandchild.

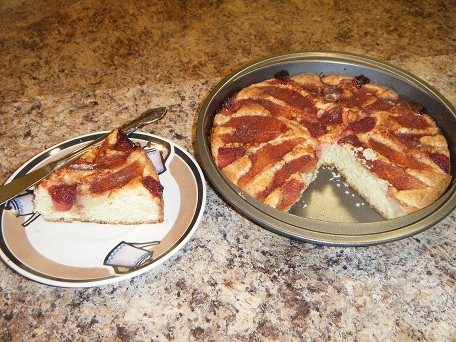
I did actually review the recipe before I started so I am improving! The first step is to butter a 9” springform pan. After Googling “springform pan” and learning it is a pan where the sides come off so you can magically slide out beautiful desserts, I decided to be cheap and just use a round cake pan I already have. In the grand scheme of things, I am not selling my baked goods and they are going to get eaten (please be eaten in lieu of thrown in the trash as inedible)!

I peeled the pears in advance of starting. This is of course where I discovered that if you buy pears five days before you use them, one will go bad in the fridge. The good news is, I had some strawberries as a back up for this recipe and I pat myself on the back as I decided to make a strawberry pear tart. As an important note, the recipe says a pound of pears cut ½” thick. I used one pear with the slices cut ¼” thick, give or take since my slicing skills aren’t that honed, and about five strawberries. In short, don’t slice up a bunch of pears or you will have pear sliced wilting in your fridge in no time. The recipe didn’t specify peeling the pears, but I did. I took half a lemon and squeezed what I think was about half of the juice over the fruit. Since the rest of the juice also ends up over the fruit later in the recipe, dividing it seems like a waste of effort.

Mixing the dry goods and setting aside was a no brainer (I did stop as I talked on the phone so I wouldn’t lose track. I’ve made that mistake before!) I started creaming the butter (which I was so proud I remembered to thaw from the freezer) without cutting it up first. This made for a slight splatter on the countertop, but I stopped, cut up the butter into little chunks and continued. The eggs blended in without drama and once the dry goods were added, sticky dough appeared. I scooped the dough into the pan with a spoon and spread it around. It ended up in the fridge uncovered so I could run to set the DVR for Mad Men. I have priorities!

Once I arranged the fruit and sprinkled on the cinnamon sugar mix (I used a heaping half teaspoon of cinnamon, who doesn’t love cinnamon?) I put the tart in the oven. I checked it at 45 minutes using a toothpick in the center and it needed more time. I gave it 5 more minutes and pulled it out of the oven and let it cool. Once it cooled for about 20 minutes I took a picture and cut into the tart. It came out of the pan cleanly after running a knife around the edge. Really, you wouldn’t even need to separate the edge from the pan if you kept the fruit from touching the pan’s edge. This is something I would watch next time. I sat down with Don Draper and wow! The tart portion is light and moist and the lemon gives the overall tang to offset the sweetness. I had two pieces (Mad Men encourages excess, you should never eat and watch simultaneously) and went to bed. This morning I brought the rest of the tart to work to avoid consuming more and it got good reviews. I guess Top Chef is Top for a reason!

Saturday, March 24, 2012

Sweet and Spicy Edamame


This recipe is easy and quite tasty. I went ahead and purchased shelled edamame and boiled it as directed. I think using the steam in the bag edamame from the freezer section would work without a problem and save you the use of a pot! Anyway, I added all of the ingredients listed to the edamame except the chile sauce and then separated the mix into two bowls. I added the chile sauce to one and left it out of the other (my two-year-old is not hip to spicy foods just yet!) They both tasted good and I was able to add a little extra chile sauce to mine for god measure. This recipe is going to get several repeat engagements in my house!

Chocolate Chip Scones - The follow up


I did manage to add chocolate chips to the rich scone mix previously posted. I added a mix of milk chocolate and semi-sweet chocolate chips and they were an excellent choice! I even purchased little rock sugar crystals (pink on the advice of my two year old) and put them on top. Instead of sprinkling them on top next time I may apply the cream to the top of the scone dough and then take each round and flip it onto a plate with the sugar on it for more even coverage. I would suggest that if you attempt these scones, you use a pan with sides. Some of the butter dripped out of the scones and dripped to the bottom of the oven where they made a mess I have yet to fully remove. It’s always something!